Foreword:
Select the Startup/idle tab and click on Idle PWM settings. Now you should have a box up that says PWM idle settings as shown below.

In the tab next to Crank-to-run Tapper time(s) I have selected [5] but let’s review what this does further.
Crank-to-run Tapper time is defined as the amount of time in seconds it takes your car to start. How many seconds you hold your key in the start position before releasing it to the run position and your motor is now purrin along. However in respect to PWM idle setting it is how many seconds from the time your motor first tuns over past its crank RPM's to the end of how many seconds you have selected that the PWM Idle valve will hold open in the position defined in the Coolant – based crank duty table.
I like my car to go verrrom! when I start it, so I have my box set to [5]. Go ahead and select 5 for now. We will come back to this later.
In the tab next to Valve mode in the same box we set the Crank-to-run Tapper time you have a choice of Normal, 0%=off and Inverted, 100% off. This just inverts the valve mode. So if you have your valve set to 40% and its acting like its at 60% you may have to invert this. Again we will touch on this subject later on. For now select ‘Normal’.
In the tab next to Valve frequency you have a choice of 1 through 8. I have 3 selected, lets see what this really means though.
Valve Frequency Selection:
Idle valves function with a rapid pulse-width on the PWM signal. The frequency makes the unit have a humming noise. This pulse-with (shaky valve) ontop of the PWM % (% of switched power gong to valve making it hold open or closed at a specific point) allow the units metered air past your throttle plate. After putting my hands on a few Volvo 740 valves and feeling the difference I came to the best setting of 3 in Tunner studio. It shakes just a tad higher than a unit connected to LH 2.4
I also managed after many weeks and phone appointments to Bosch to get a tech on the phone who makes these valves. Many times he kept saying to my requests, “that’s proprietary information and I cannot help you with that specific question.” The good news is after I explained to him that I was using MS and what that was and that I was part of a community of Volvo freaks he did open up a bit and explain a few things that will keep us from wreaking these valves. #1 too low a freq will cause the valve to overheat and work too hard. Basically under 54 HZ (setting of under [2] ). He would not release the Freq that they were made for but he did say that too high of a Freq will not kill the valve but may allow it to become clogged or worse yet Ice up in a cold environment the same way a carburetor does. There is allot more information on the Freq but gong too high can cause even more problems he suggested I keep it under 160 ish HZ. A setting of [3] give us 91.5 and it sounds and feels close to LH 2.4 good enough for me.
Now Burn them settings.
Now that the car starts happy like we can move onto Idle PWM Duty table.
Go ahead and select it from the Starup/ Idle tab. This table will determin your idle speed. Less air = lower idle. Assuming your VE tables are correct. Expect to muck with them too a bit now that you have control of the air going past the intake plate. You set up this table the same as you did the Crank Duty table but with greater precision. Keep burning your changes and you have to be quick and do it multiple times as the coolant temps keeps going up you will have to keep in a race against it while you keep adjusting the Valves Duty %
From here on im sure you can figure it out. Hope this helps every one else in this endeavor.
I see no point in posting my valves as I'm constantly tweaking them and fine tuning it in now that I have figured it all out. Also every motor is different and will require different settings.
GOOD LUCK.
So while tuning MS II with Tuner Studio I’ve found little help setting up my Fast Idle Valve. On top of that there is not much info on setting up a B230 idle valve on any platform besides the, “occasional values that worked for me,” table.
Here I will try to explain the terms and information on the subject in connection with tuning them in with Tuner Studio.
Here I will try to explain the terms and information on the subject in connection with tuning them in with Tuner Studio.
- Getting setup
I like to see what the valve is doing! You will not have to do this. However if you are having issues I would highly suggest you do this.
The valve use a Bosch EV1 connector. I like using the remote harness I made so I can have the Idle valve sitting in my lap while I’m in front of the laptop adjusting its values.


To make this harness for less than $10 USD you need to make a trip the the junk yard. Cut off one injector plug harness from the fuel rail of a Volvo and also take a Crank position sensor off the top of the bell housing of the transmission of any LH2.4 car. This will give you a male and female end for your new EV2 extension cord. Make sure when you wire them together that the wires and connectors stay parallel. Otherwise the valve will be working in reverse.
Also take the time to confirm that your wiring to the MS for you idle valve is correct. This is rather hard to mess up one end goes to Positive switched voltage source; the other wire goes to the FIdle wire from the MS box. All of this is assuming you have your MS box built for FIdle. If you connect them backwards no big issue you can reverse the way the valve functions later. However if you don’t want to do this step later connect the FIdle wire to the neg side of the plug and the Postive wire to the positive side of the plug. See plug pinout below.

The valve use a Bosch EV1 connector. I like using the remote harness I made so I can have the Idle valve sitting in my lap while I’m in front of the laptop adjusting its values.
To make this harness for less than $10 USD you need to make a trip the the junk yard. Cut off one injector plug harness from the fuel rail of a Volvo and also take a Crank position sensor off the top of the bell housing of the transmission of any LH2.4 car. This will give you a male and female end for your new EV2 extension cord. Make sure when you wire them together that the wires and connectors stay parallel. Otherwise the valve will be working in reverse.
Also take the time to confirm that your wiring to the MS for you idle valve is correct. This is rather hard to mess up one end goes to Positive switched voltage source; the other wire goes to the FIdle wire from the MS box. All of this is assuming you have your MS box built for FIdle. If you connect them backwards no big issue you can reverse the way the valve functions later. However if you don’t want to do this step later connect the FIdle wire to the neg side of the plug and the Postive wire to the positive side of the plug. See plug pinout below.
- On to tuning
Idle valve in lap and unplugged.(if you have left the valve in your car and think its functioning proper like continue on with suggestions below.
If your Idle Valve is in your lap, as I suggest, then unplug your injector wires or disable your fuel pump ETC. We do not want the car starting.
If your Idle Valve is in your lap, as I suggest, then unplug your injector wires or disable your fuel pump ETC. We do not want the car starting.
- Idle Control
With your car on (not running), power going to the MS box, your laptop connected and talking to the MS box with TunnerStudio Select the Startup/idle tab.
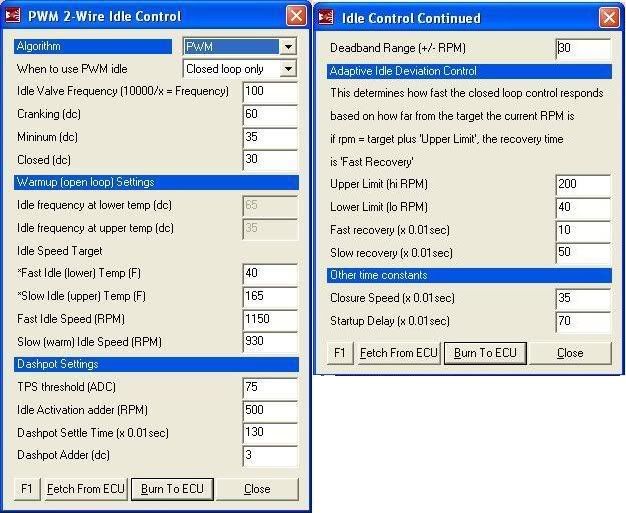
Click the sub-tab of Idle Control. You should get the box below.

In the tab next to Algorithm select ‘PWM warmup. ‘ Burn settings to MS box.
We will not be using ‘PWM closed loop.’ Too many factors to go wrong. ‘PWM warup’ had a nice stable idle that you define based on coolant temp(s). If you want to be brave and give closed loop a go, have fun. I’ve been working on this for 2 months and have found ‘PWM warmup’ nicer to define and control. However if you have questions about the closed loop system I now know it in and out and would be happy to field questions.
Click the sub-tab of Idle Control. You should get the box below.
In the tab next to Algorithm select ‘PWM warmup. ‘ Burn settings to MS box.
We will not be using ‘PWM closed loop.’ Too many factors to go wrong. ‘PWM warup’ had a nice stable idle that you define based on coolant temp(s). If you want to be brave and give closed loop a go, have fun. I’ve been working on this for 2 months and have found ‘PWM warmup’ nicer to define and control. However if you have questions about the closed loop system I now know it in and out and would be happy to field questions.
- Idle PWM settings
Select the Startup/idle tab and click on Idle PWM settings. Now you should have a box up that says PWM idle settings as shown below.
In the tab next to Crank-to-run Tapper time(s) I have selected [5] but let’s review what this does further.
Crank-to-run Tapper time is defined as the amount of time in seconds it takes your car to start. How many seconds you hold your key in the start position before releasing it to the run position and your motor is now purrin along. However in respect to PWM idle setting it is how many seconds from the time your motor first tuns over past its crank RPM's to the end of how many seconds you have selected that the PWM Idle valve will hold open in the position defined in the Coolant – based crank duty table.
I like my car to go verrrom! when I start it, so I have my box set to [5]. Go ahead and select 5 for now. We will come back to this later.
In the tab next to Valve mode in the same box we set the Crank-to-run Tapper time you have a choice of Normal, 0%=off and Inverted, 100% off. This just inverts the valve mode. So if you have your valve set to 40% and its acting like its at 60% you may have to invert this. Again we will touch on this subject later on. For now select ‘Normal’.
In the tab next to Valve frequency you have a choice of 1 through 8. I have 3 selected, lets see what this really means though.
Valve Frequency Selection:
Idle valves function with a rapid pulse-width on the PWM signal. The frequency makes the unit have a humming noise. This pulse-with (shaky valve) ontop of the PWM % (% of switched power gong to valve making it hold open or closed at a specific point) allow the units metered air past your throttle plate. After putting my hands on a few Volvo 740 valves and feeling the difference I came to the best setting of 3 in Tunner studio. It shakes just a tad higher than a unit connected to LH 2.4
I also managed after many weeks and phone appointments to Bosch to get a tech on the phone who makes these valves. Many times he kept saying to my requests, “that’s proprietary information and I cannot help you with that specific question.” The good news is after I explained to him that I was using MS and what that was and that I was part of a community of Volvo freaks he did open up a bit and explain a few things that will keep us from wreaking these valves. #1 too low a freq will cause the valve to overheat and work too hard. Basically under 54 HZ (setting of under [2] ). He would not release the Freq that they were made for but he did say that too high of a Freq will not kill the valve but may allow it to become clogged or worse yet Ice up in a cold environment the same way a carburetor does. There is allot more information on the Freq but gong too high can cause even more problems he suggested I keep it under 160 ish HZ. A setting of [3] give us 91.5 and it sounds and feels close to LH 2.4 good enough for me.
Now Burn them settings.
[*]PWM Idle cranking duty
Select the Startup/idle tab and click on PWM Idle cranking duty. A table should pop up like the one shown below.

This is the table that determines how much air goes through the Idle Valve when your cranking your engine over. We finally get to start seeing our valve in action in this section.
I found that my valve is fully open near 90%. But best to have you determine this yourself.
Plug in your Idle valve. It should start humming or you should feel it humming.
In the Table Coolant-based crank duty you should see a red dot that is moving around just a hair. It is telling you the current coolant temp. Move the nearest blue dot ontop of the red dot. On the left of the table gong up it tells you in % the Duty cycle. Its EZ-er to think of this as how far the valve will be open. Drag that blue dot toward the sky above the red dot and it should go up as well.
Don’t freak. At this point the Idle valve will do nothing! This is the crank setting. So go ahead and in one hand hold the valve so you can see the opening and with the other hand turn your car over. You should see the valve open up like in the image below.

Now do the same thing above but lower the blue dot down a few % . Keep doing this until the valve starts to close. Then go back up with the blue dot and stop when the valve stops to open. Pick a value in the middle of these, mine was 89.8 % this is the PWM duty percent needed to open the valve all the way. Record this on paper for later.
Now we are going to do the same thing but go down in % until the Idle valve fully closes. If you go too far it will start to open again from the other side. This is a safety feature set into the valve encase it can’t get power or fails. It will allow air to pass and give you a high idle so you won’t be stalling out whenever you let off the gas. This allows you time to get a new unit. If you went too far just give it more % until its fully closed like in the image below.

Write this % down for later. Mine is fully closed right around 44%.
Whoo hoo ! we now know the settings to get your valve to fully open and fully close!
Install valve and get RDY to tune.
NOTE: As descussed before If the valve behaves backwards you need to go back to Idle PWM settings and change from Normal, 0%=off to Inverted, 100% off
This is the table that determines how much air goes through the Idle Valve when your cranking your engine over. We finally get to start seeing our valve in action in this section.
I found that my valve is fully open near 90%. But best to have you determine this yourself.
Plug in your Idle valve. It should start humming or you should feel it humming.
In the Table Coolant-based crank duty you should see a red dot that is moving around just a hair. It is telling you the current coolant temp. Move the nearest blue dot ontop of the red dot. On the left of the table gong up it tells you in % the Duty cycle. Its EZ-er to think of this as how far the valve will be open. Drag that blue dot toward the sky above the red dot and it should go up as well.
Don’t freak. At this point the Idle valve will do nothing! This is the crank setting. So go ahead and in one hand hold the valve so you can see the opening and with the other hand turn your car over. You should see the valve open up like in the image below.
Now do the same thing above but lower the blue dot down a few % . Keep doing this until the valve starts to close. Then go back up with the blue dot and stop when the valve stops to open. Pick a value in the middle of these, mine was 89.8 % this is the PWM duty percent needed to open the valve all the way. Record this on paper for later.
Now we are going to do the same thing but go down in % until the Idle valve fully closes. If you go too far it will start to open again from the other side. This is a safety feature set into the valve encase it can’t get power or fails. It will allow air to pass and give you a high idle so you won’t be stalling out whenever you let off the gas. This allows you time to get a new unit. If you went too far just give it more % until its fully closed like in the image below.
Write this % down for later. Mine is fully closed right around 44%.
Whoo hoo ! we now know the settings to get your valve to fully open and fully close!
Install valve and get RDY to tune.
NOTE: As descussed before If the valve behaves backwards you need to go back to Idle PWM settings and change from Normal, 0%=off to Inverted, 100% off
- Tuning with valve installed.
Now that you have the valve in the car we can start to play with the Coolant-based crank duty and the Idle PWM Duty table.
First lets start with a cold motor and pull up the Coolant-based crank duty table we used before to find out your idle valves % open and closed settings.
Ive never encountered -40 deg before so I can only assume that Ill set that at 90% duty. Move over to the 220 deg dot and move it to your idle closed setting. Mine was 44% so I set it there.
With the other 2 dots in the middle of the graph 46.7 deg and 133 deg move them to form a strait line.
We are now ready to see if it will start. However we have not set up the Idle PWM Duty table so there is no point in letting it run for more than a few seconds. Also we don’t want to raise the coolant temp. If the car starts with allot of cranking move the % up a tadd at a time while retrying to start it. When it starts the way you like it leave the setting alone. Also be sure that you are burning the settings every time you adjust them FYI.
Over time or as you keep raising coolant temp you will have to keep adjusting the Idle PWM Duty table until it starts under every condition you may encounter. We have only fine tuned the current temp in your garage at this moment. I would tackle this by running the motor until it hits a temp near the next dot then fine tune that one in. But first lets get your idle straitened out.
[*]Idle PWM Duty table.
Now that the car starts happy like we can move onto Idle PWM Duty table.
Go ahead and select it from the Starup/ Idle tab. This table will determin your idle speed. Less air = lower idle. Assuming your VE tables are correct. Expect to muck with them too a bit now that you have control of the air going past the intake plate. You set up this table the same as you did the Crank Duty table but with greater precision. Keep burning your changes and you have to be quick and do it multiple times as the coolant temps keeps going up you will have to keep in a race against it while you keep adjusting the Valves Duty %
From here on im sure you can figure it out. Hope this helps every one else in this endeavor.
I see no point in posting my valves as I'm constantly tweaking them and fine tuning it in now that I have figured it all out. Also every motor is different and will require different settings.
GOOD LUCK.
Last edited: