
-
Hello Guest, welcome to the initial stages of our new platform!
You can find some additional information about where we are in the process of migrating the board and setting up our new software hereThank you for being a part of our community!
You are using an out of date browser. It may not display this or other websites correctly.
You should upgrade or use an alternative browser.
You should upgrade or use an alternative browser.
240 AC pressure switch bypassed
- Thread starter volvowagoon
- Start date
iHateVolvoPeople
Active member
- Joined
- Feb 1, 2014
- Location
- Midwest
Whaaaat that?s neat. I?d like to have a high side fitting on my cars.Sell it and buy one with a high side fitting . . . or . . .
NAPA will be happy to sell you a high side hose with a fitting.
"There is no high side fitting."
Although I looked and felt around I did not find one. But are you sure there isn't one on an original 89 compressor that was using r12? How would you balance the system or no need just vacuum and fill from low side?
Vacuum from the low side only, it works fine. The system is equalized without the compressor on anyway. It just takes a hair more time probably, but you won?t even notice.
volvowagoon
Active member
- Joined
- Jul 19, 2012
- Location
- Franklin, IN
Not to high jack but where is high side on an 89 240DL? Need to do some work on the ac but cannot find where to connect my gauges. Having a duh moment in this heat. Thanks. I did find the low side but is the high side also on the compressor?
By all means, hijack this thread because after doing a good inspection of my system I am thoroughly confused by what I have. lol The more information on the old system I can find, the better.
There is no high side fitting.
This makes me wonder if mine was in fact converted. I recall seeing another fitting somewhere behind the grille. I'll have to check again.
KeizerBrickGuy
Sh*t pot stirrer
- Joined
- Jun 7, 2016
- Location
- Keizer, OR
TLDR
Here's what I suggest as I did what I'm recommending you do as I did to my Wife's 1990 and the performance is awesome. Get the system evacuated and get a new receiver drier(they come with a new switch installed), a new expansion valve, a decent AC manifold service set, a can tap to use the service set with refrigerant cans and three cans of duracool(Follow the chart I have linked below, it's just over two cans). Great thing about duracool is it is compatible with PAG and Ester and POE oils. Duracool is an R12 replacement so it cools as good as R12 and far better and R134a. Replace the old parts, be sure to use new seals on the connections you crack open. Get someone to pull a solid vacuum on the system. Then drive home and fill it up on the second fan speed and the AC control knob set to max. Remember, it is better to underfill than over fill
Here is some info before you start:
https://forums.tbforums.com/showpost.php?p=5635985&postcount=15
http://www.duracool.com/Duracool/faqs.html
volvowagoon
Active member
- Joined
- Jul 19, 2012
- Location
- Franklin, IN
I'm back and slightly more educated. The car is finally oil and water leak free with a less elastic timing belt as well.  It's time to address the AC!
I went through the huge mass or receipts that came with the car. It was clearly loved for the majority of its life, and had the AC converted to R-134a with PAG oil by an independent shop in the 90s. This at least seals my decision to keep R-134a in it. The conversion however did not include the new hard line with a high side fitting near the drier. I noticed that the compressor valve assembly has two fittings on it. I can't find much information on this, because the new ones don't appear to have any fittings on them.
Anyway, somehow it looks like the shop managed to charge the system with straight adapters. I don't know how they possibly could have gotten their gauge set hooked up since they both have next to no room for service. Does anybody know if I could get away with just putting 90 degree fittings on there? I'm not sure if that's even going to allow enough space to attach gauges with the compressor still on the engine.
It's time to address the AC!I went through the huge mass or receipts that came with the car. It was clearly loved for the majority of its life, and had the AC converted to R-134a with PAG oil by an independent shop in the 90s. This at least seals my decision to keep R-134a in it. The conversion however did not include the new hard line with a high side fitting near the drier. I noticed that the compressor valve assembly has two fittings on it. I can't find much information on this, because the new ones don't appear to have any fittings on them.
Anyway, somehow it looks like the shop managed to charge the system with straight adapters. I don't know how they possibly could have gotten their gauge set hooked up since they both have next to no room for service. Does anybody know if I could get away with just putting 90 degree fittings on there? I'm not sure if that's even going to allow enough space to attach gauges with the compressor still on the engine.
Last edited:
volvowagoon
Active member
- Joined
- Jul 19, 2012
- Location
- Franklin, IN
I'm back again... The car has been running without much issue for the last year or so with a little body work break over the winter. Since it's getting warm again, I'd like to make the 240's AC a priority again. I took a couple pics to better illustrate what I'm dealing with, and the direction I'm going to take.
We determined a while back that these cars did not originally come with a high side fitting. However, I believe that this was an addition made to cars with dealer installed retrofits.

That's great and all, but its butted up pretty close to the block. It's close, but there's no way for me to hook up my high side gauge. Then there's a low side fitting on the other side of the manifold.

There's no clearance issues here, but the fitting is almost half the size of a normal low side fitting. Were r134a charge ports not universal in the early days? I'm considering just replacing both with 90 degree fittings since I believe that the original r12 connections are normal. Perhaps Volvo just charged the system with r12 hoses, and these fitttings were added by some DIYer. I'm not sure yet. I did at least confirm that the manifold has AN style fittings under the conversion fittings.
We determined a while back that these cars did not originally come with a high side fitting. However, I believe that this was an addition made to cars with dealer installed retrofits.
That's great and all, but its butted up pretty close to the block. It's close, but there's no way for me to hook up my high side gauge. Then there's a low side fitting on the other side of the manifold.
There's no clearance issues here, but the fitting is almost half the size of a normal low side fitting. Were r134a charge ports not universal in the early days? I'm considering just replacing both with 90 degree fittings since I believe that the original r12 connections are normal. Perhaps Volvo just charged the system with r12 hoses, and these fitttings were added by some DIYer. I'm not sure yet. I did at least confirm that the manifold has AN style fittings under the conversion fittings.
volvowagoon
Active member
- Joined
- Jul 19, 2012
- Location
- Franklin, IN
Okay, that high side r12 fitting is confirmed to be a -4 AN, so I will buy accordingly for that adapter. The low side isn't as great of news though. It's either rounded off, or not an adapter that's supposed to be removed. Either way, I hope I won't have to remove the compressor.
I went up by the receiver/drier and tried to find the other adapter that people speak of. I have no idea why there's a random plug, but that seems worthless to me. Also, what is this?? Is this another non-standard charge fitting?

I went up by the receiver/drier and tried to find the other adapter that people speak of. I have no idea why there's a random plug, but that seems worthless to me. Also, what is this?? Is this another non-standard charge fitting?
volvowagoon
Active member
- Joined
- Jul 19, 2012
- Location
- Franklin, IN
Okay people, sorry for all the speculation and lack of action in this thread. Today I will begin to deliver!
I got some seemingly decent quality conversion fittings from O'reilly's, removed the old ones and installed the new ones. Luckily the old fittings weren't super tight, so I was able to remove the rounded low-side fitting with some grippy pliers. Compressor removal was not necessary like I planned. I also noticed that one of the old fittings had a messed up shroeder valve which would have caused a leak.

After drawing a vacuum for a half hour and shutting the valves, I waited overnight. This was what I found this morning! I guess the valve was the main issue.

I have a new receiver/drier and r-134a pressure switch, so I will install those and fill the system tonight!
I got some seemingly decent quality conversion fittings from O'reilly's, removed the old ones and installed the new ones. Luckily the old fittings weren't super tight, so I was able to remove the rounded low-side fitting with some grippy pliers. Compressor removal was not necessary like I planned. I also noticed that one of the old fittings had a messed up shroeder valve which would have caused a leak.
After drawing a vacuum for a half hour and shutting the valves, I waited overnight. This was what I found this morning! I guess the valve was the main issue.
I have a new receiver/drier and r-134a pressure switch, so I will install those and fill the system tonight!
volvowagoon
Active member
- Joined
- Jul 19, 2012
- Location
- Franklin, IN
Not sure if anybody still cares, but I'm going to finish this thread anyway.
First of all, I'm not too worried about leaks anymore. This fitting was quite jacked.

I removed the old receiver/drier and was unhappy with the appearance of the holster bracket, so I wire wheeled it and sprayed on some rust encapsulator. While I waited for that to dry, I started preparing the new drier and pressure switch. Oddly the switch came with a black oring and the drier had none. Luckily I have a good stash of green ones. The last piece of the puzzle was the little foam insulator strip that keeps the drier from flopping around in the holster and vibrating on the core support. I think foam window sealant worked great here.

I was still waiting for paint to dry, so addressed an issue even more annoying that no AC. I remember the previous owner being pretty proud of installing the updated heater valve in this car, so I had a hunch as to why the vents wanted to melt my face off even when the fan was turned off! I was right. The cable was not adjusted properly, and the heater core had coolant flowing through it all the time. That's an easy fix though.
<iframe width="560" height="315" src="https://www.youtube.com/embed/QZwSCnKFdl4" frameborder="0" allow="accelerometer; autoplay; encrypted-media; gyroscope; picture-in-picture" allowfullscreen></iframe>
By that time the paint was dry, so I put everything back together.

After that I drew a vacuum for another half hour, turned the pump off, and ate dinner.
Dinner was good, and my vacuum held the whole time. Time to charge! I use standard refrigerant. Additives and sealants not only add cost, but cause more harm than good. Plus, if the refrigerant is mixed with other stuff how are you supposed to know the charge by weight? You can go by pressure, but I'm not a fan of that method.


This is less than stellar, but this was to be expected with crappy stock heat exchangers. I confirmed that full blast fan settings and maxed TXV are a must on a sunny mid-80 degree day with high humidity and no tints to be comfortable, but it's worlds better than nothing!
I don't know if this will help anybody, but I had fun talking about it. lol
First of all, I'm not too worried about leaks anymore. This fitting was quite jacked.
I removed the old receiver/drier and was unhappy with the appearance of the holster bracket, so I wire wheeled it and sprayed on some rust encapsulator. While I waited for that to dry, I started preparing the new drier and pressure switch. Oddly the switch came with a black oring and the drier had none. Luckily I have a good stash of green ones. The last piece of the puzzle was the little foam insulator strip that keeps the drier from flopping around in the holster and vibrating on the core support. I think foam window sealant worked great here.
I was still waiting for paint to dry, so addressed an issue even more annoying that no AC. I remember the previous owner being pretty proud of installing the updated heater valve in this car, so I had a hunch as to why the vents wanted to melt my face off even when the fan was turned off! I was right. The cable was not adjusted properly, and the heater core had coolant flowing through it all the time. That's an easy fix though.
<iframe width="560" height="315" src="https://www.youtube.com/embed/QZwSCnKFdl4" frameborder="0" allow="accelerometer; autoplay; encrypted-media; gyroscope; picture-in-picture" allowfullscreen></iframe>
By that time the paint was dry, so I put everything back together.
After that I drew a vacuum for another half hour, turned the pump off, and ate dinner.
Dinner was good, and my vacuum held the whole time. Time to charge! I use standard refrigerant. Additives and sealants not only add cost, but cause more harm than good. Plus, if the refrigerant is mixed with other stuff how are you supposed to know the charge by weight? You can go by pressure, but I'm not a fan of that method.
This is less than stellar, but this was to be expected with crappy stock heat exchangers. I confirmed that full blast fan settings and maxed TXV are a must on a sunny mid-80 degree day with high humidity and no tints to be comfortable, but it's worlds better than nothing!
I don't know if this will help anybody, but I had fun talking about it. lol
kyote
Living The Dream
- Joined
- Apr 27, 2003
- Location
- La Porte TX
What did you adjust the TXV to?
Did you replace with new?
Did you replace with new?
volvowagoon
Active member
- Joined
- Jul 19, 2012
- Location
- Franklin, IN
What did you adjust the TXV to?
Did you replace with new?
I actually didn't touch it. I assumed that it was replaced or adjusted by the Volvo dealer when they did the conversion many years ago. I could be wrong, but I but the TXV does not appear to be a fun part to replace. I thought that I could blame the lack of performance when we bought the car on the misadjusted heater valve cable. However, after driving it a day I don't think it's much different.
It might be rewarding to go in there and find out that the TXV is original, but if I waste a bunch of time taking it out only to put it back in as I found it I wouldn't be too happy. I figured I'd wait until I had to go into that part of the dash for another reason and kill two birds with one stone.
Last edited:
volvowagoon
Active member
- Joined
- Jul 19, 2012
- Location
- Franklin, IN
What did you adjust the TXV to?
Did you replace with new?
Do you have any insight? Should mine be blowing colder even with the stock evaporator and condenser?
kyote
Living The Dream
- Joined
- Apr 27, 2003
- Location
- La Porte TX
I'm going in to pull and clean evap and replace txv this weekend, as well as flush and clean everything.
If I get 40* on the freeway I'll be quite happy.
I haven't decided if I am going to mess with the new URO TXV just yet.
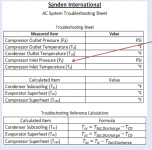
The "correct" way to do it would be to install as is, and collect data to fill in this chart, and adjust accordingly. Unfortunately in my case this means blowing a charge or 2 to figure it out.
http://www.sanden.com/objects/3_-_Troubleshooting_-_Web_01.pdf
If I get 40* on the freeway I'll be quite happy.
I haven't decided if I am going to mess with the new URO TXV just yet.
The "correct" way to do it would be to install as is, and collect data to fill in this chart, and adjust accordingly. Unfortunately in my case this means blowing a charge or 2 to figure it out.
http://www.sanden.com/objects/3_-_Troubleshooting_-_Web_01.pdf
Attachments
volvowagoon
Active member
- Joined
- Jul 19, 2012
- Location
- Franklin, IN
Did URO come out with something better? I was vacuuming the car and bumped the inner kick panel which made a bunch of leaves fall out. I decided to pull that off and suck the rest out which prompted me to check out the TXV. Oof.

There's hardly any insulation left. I'd hate to pull something apart that works as-is, but I wish I cleaned this up and checked the setting now.
Can I reinsulate it? What do people usually use for that? I have a bunch of butyl tape a strip caulk will either of those work?
There's hardly any insulation left. I'd hate to pull something apart that works as-is, but I wish I cleaned this up and checked the setting now.
Can I reinsulate it? What do people usually use for that? I have a bunch of butyl tape a strip caulk will either of those work?
kyote
Living The Dream
- Joined
- Apr 27, 2003
- Location
- La Porte TX
Txv valve should not be insulated per green book.
As far as reinsulating the other stuff butyl tape would work methinks.
As far as reinsulating the other stuff butyl tape would work methinks.